Geometry(여기선 mesh)를 개선시킴과 동시에 주어진 indoor mesh의 texture을 생성
자연어를 사용하여 낮은 품질의 3D mesh의 geometry과 일치하지만 스타일은 다른 3D scene을 구축
기존의 이미지 합성 방법과 달리, Roomdreamer는 입력 scene structure와 text prompt에 맞춰 geometry과 texture를 동시에 일치시킨다.(?)
Geometry를 개선하는 것을 목표로 하며, 이는 이전 기술들이 주로 새로운 geometry을 생성하는 데 초점을 맞추는 것과 대조적이다.
Main contributions
주어진 mesh를 편집하기 위해 2D diffusion model을 사용한 프레임워크를 제안한다. 이 프레임워크의 특징은 geometry와 texture 두가지 모두를 text prompt를 사용하여 편집하고 style을 수정할 수 있다는 것이다.
Diffusion 모델을 제어하기 위한 2D diffusion scheme을 고안하였다. 이러한 scheme은 입력 mesh에 대한 scene consistent하고 구조적으로 일정한 texture을 생성할 수 있다.
스마트폰으로 스캔한 indoor mesh를 사용하여 다양한 실험을 진행하였다. 이를 통해 프레임워크의 효율성과 신뢰성을 증명하였다.
Related works
Text2Room - 2D diffusion model과 depth model을 사용하여 text prompt에 대응하는 textured room mesh를 생성한다.
반면, RoomDreamer은 scanned mesh을 guidance로 사용한다. 따라서 새롭게 생성된 3D scene들은 입력 scene과 정확하게 정렬됨과 동시에 다른 스타일로 변환되는 것이 가능하다.
InstructN2N은 2D 이미지를 편집한다. 따라서 새로운 scene을 생성할 때 이미지 기반 편집에 국한되어 있을 수도 있다.
반면, RoomDreamer은 geometry-controlled 2D diffusion 생성을 사용한다. 이러한 방법은 오리지널 scene의 texture에 방해받지 않는다는 장점이 있다.
Method
Overview
Roomdreamer은 2가지 요소로 이루어진 프레임워크이다. 첫번째는 "Geometry guided diffusion for 3d Scene"이며 두번째는 "Mesh optimization"이다. 첫번째 요소는 2D pior을 전체 scene에 동시에 적용함으로써 scene의 consistency를 얻는 데에 집중한다. 두번째 요소는 스캔한 scene의 artifacts를 제거하고 geometry와 texture을 동시에 개선하는 역할을 한다.
1. Geometry Guided Diffusion for 3D Scene
순서)
Cubemap 생성
Differentiable rendere을 사용하여 mesh texture을 업데이트
Scene에서 랜덤하게 카메라를 샘플링
Cubemap에 담기지 않은 영역은 아웃페인팅으로 업데이트
1) Cubemap 생성
View-by-view outpainting
Scene texture을 2D 이미지를 diffusion model을 사용하여 생성하고 임의적으로 위치한 카메라를 시작으로 관찰되지 않은 영역을 outpainting하는 아주 직관적인 방법이다.
하지만 이러한 방법은 artifacts를 만들기 때문에 2D diffusion model의 outpainting 능력을 제한시킨다.
Eq.1) diffusion step
Eq.2) diffusion model as a mapping functionEq.3) the whole diffusion process from random noise and conditioned on the text and depth
Artifacts를 피하기 위해 RoomDreamer은 Cubemap을 사용한 방법을 차용한다. 즉, Room의 가장 중앙의 view의 scene을 담은 360º 사진을 생성한다.
Cubemap = cube camera로 찍은 360º 사진
Diffusion process를 cubemap path들로 연장하면서 2D diffusion model을 사용하여 panorama 이미지(cubemap)를 생성하는 것이 가능해진다.
"MultiDiffusion: Fusing Diffusion Paths for Controlled Image Generation" 이 논문을 보면 정확한 기전을 이해할 수 있을 것이나 우선은 diffusion model로 파노라마 이미지를 생성할 수 있다는 것만 기억하자.
Text prompt에 condition된 일반적인 diffusion model과는 다르게 Roomdreamer은 text prompt C_text와 depth map D에 conditioned된 diffusion model을 사용한다. (Eq. 1)
하지만 depth map을 바로 cubemap 생성을 제어하기 위해 사용하는것은 inconsistency로 이어질 수 있다.
다른 카메라 포즈들은 cube map faces의 depth value의 inconsistency를 야기할 수 있다.
더 자세히 설명하자면, 각 카메라에 연관된 depth map은 카메라와 평면 간의 거리로 표현된다. 따라서 동일한 평면에 대해 다른 뷰에서 depth value가 크게 다를 수 있으며, 이로 인해 artifacts가 발생할 수 있다.
depth map과 distance map의 차이
이를 극복하기 위해 distance map D^을 고안한다.
Distance map D^는 points와 camera origin의 geometric distance를 나타낸다.
Distance map D^과 depth map D의 diffusion process를 control하는 것에서 차이점이 있다.
D에서는 구조물이 RGB 이미지와 잘 정렬이 되어 있는 반면 D^에서는 그렇지 못한다.
그 대신 D^에서는 cubemap에서 (cube faces간의) border가 더 smoother하다.
Single semantic mask를 사용하여 자연 scene의 novel view를 합성하는 특수 환경에 집중한다.
(보통은 semantic mask를 사용하여 novel view를 합성하지 않는다.)
Semantic mask를 입력 조건으로 사용함으로써 이를 편집하여 3D contents를 만드는 작업이 가능해진다.
기존 방법의 한계
2D semantic image synthesis method:
underlying 3D world를 고려하지 않아 free-viewpoint video를 생성하는 데에 사용될 수 없다.
Single-view view synthesis method(더 일반적인 용어로는 novel view synthesis from a single image):
Test시에는 single image만 필요하지만 보통 아래 그림처럼 학습 데이터로는 multi-view images를 요구한다.
하지만 urban 또는 실내 scene들에 비해서 natural scene은 3D 데이터나 비디오 데이터가 없기 때문에 해당 논문 task에는 기존 방법 적용이 어렵다.
Train, test inputs and outputs of Infinite Nature
Contributions
Single-view image 데이터셋으로 학습이 가능한 semantics-guided view synthesis of natural scene 프레임워크를 제안
Task를 더 간단한 task 2개로 구분
Novel view의 semantic mask를 생성
입력 semantic mask를 SPADE 모델을 사용하여 RGB 이미지로 변환
Depth estimator을 사용하여 RGB 이미지의 depth map을 추정
추정된 depth map을 사용하여 입력 semantic mask를 novel view로 warp
SPADE 모델을 사용하여 생성된 semantic mask를 RGB 이미지로 변환
novel view synthesis 네트워크 학습에는 이미지보다 semantic mask가 훨씬 쉽다는 것을 증명
Semantic mask들을 융합하고 노이즈를 제거하기 위해서 Neural semantic field를 학습
Inpainting model로 생성한 semantic mask는 view inconsistent한 경향이 있음
Views마다 다른 사소한 차이도 content 상에서 큰 차이를 만들어낼수 있기 때문에 이를 해결하기 위함
Method
Overview
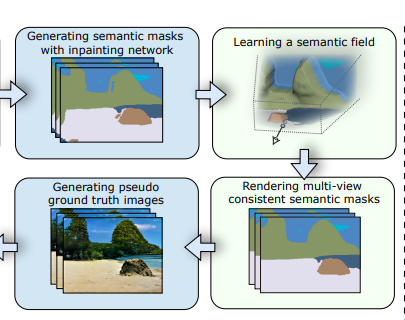
파이프라인을 2 단계로 구분한다. 첫번째 sectiino에서는 view-consistent semantic mask를 생성하는 방법에 대해서 설명하고 두번째 section에서는 SPADE를 사용하여 multiview sementic mask를 컬러 이미지로 변환하고, view-consistent 렌더링을 위해 neural scene representation을 복구하는 방법에 대해 설명한다.
Generating view-consistent semantic masks
1. Warping semantic mask
Depth-based warping technique 사용
입력 semantic map을 SPADE 를 사용하여 RGB 이미지로 변환
monocular depth estimation network를 사용하여 생성된 RGB 이미지의 depth map을 예측
예측된 depth에 기반하여3Dtriangular mesh 생성
semantic mask는 mesh로 변환되어, 해당하는 semantic label로 색상을 할당
생성된3Dtriangular mesh는 depth map의 불연속성으로 인해 가짜 엣지를 포함. 이를 해결하기 위해, 서로 먼 vertices를 가진 엣지를 제거
마지막으로, mesh renderer를 사용하여 semantic mask를 novel view로 warping
2. Semantic mask inpainting
Input semantic를 직접 novel view로 warping하면 disoccluded (가려졌다가 이제는 보이는) 영역에 많은 구멍 발생
semantic inpainting network 훈련 방법
누락된 영역을 inpaint하기 위해 self-supervised 기법을 사용하여 single-view natural images로 semantic inpainting network를 훈련
먼저 사전 훈련된 image segmentation model과 monocular depth estimation model을 사용하여 natural images의 semantic mask와 depth map 생성
각 training interation마다, source image I_i를 데이터셋에서 무작위로 샘플링
Depth map Dˆ i를 사용하여 원본 semantic mask S_i를 random target view j로 warping하여 warped semantic mask S_(i→j)와 target view j에서의 depth map Dˆ( i→j)를 생성
Semantic mask S_(i→j)를 다시 source view로 depth map Dˆ (i→j)를 사용하여 warping하여 구멍이 있는 semantic mask S_(i→j→i)를 생성
마지막으로, semantinc inpainting network에 S_(i→j→i)를 입력하고 훈련시켜 구멍을 inpainting. 원본 semantic mask S_i와 함께 지도 학습됨
테스트 시에는 무작위로 viewpoint set을 샘플링한 후, 주어진 semantic mask S_0를 이 viewpoints로 warping하여 warped semantic mask를 생성. 그 다음 inpainting network를 사용하 disoccluded 영역을 inpainting
3. Semantic field fusion
Inpainted semantic mask가 view-consistent하지 않을 경우 SPADE로 생성한 이미지에서 큰 artifacts가 생성됨
이 문제를 해결하고자 semantic field를 도입하여 inpainted semantic mask를 융합하고 노이즈를 제거
3D scene의 semantics와 geometry를 표현하기 위해 continuous neural field (semantic field 보다 더 높은 개념이지만 논문에서는 결국 semantic field를 뜻함)를 도입
논문에서는 "We adopt a continous neural field to represent the semantics and geometry of a 3D scene, similar to ~~~"라고 하며 ~~~에 해당하는 논문에서 아래 그림을 발췌했다.
아래 논문에서 강조한 것은 3D reconstruction을 위해 geometry뿐만이 아니라 semantic information도 포함했다는 것이다.
Continuous neural field에서는 MLP 네트워크 f_θ는 3D 공간에서의 임의의 쿼리 포인트 x를 SDF 값 d와 중간 피쳐 z로 매핑힌다. 그 다음 다른 MLP 네트워크 f_φ가 intermediate feature z를 semantic logit s로 매핑한다.
Signed distance field (SDF)= 점으로부터 가장 가까운 표면까지의 거리를 나타내는 값
주어진 3D 공간의 점 x에 대해, MLP는 x의 feature을 추출하는 역할을 수행한다. 이 feature은 일반적으로 SDF 값과 intermediate feature로 구성된다.
중간 피쳐는 점 x의 semantic information를 포함하며, 일반적으로 semantic logit으로 표현된다.
M_s = number of semantic classes
Neural field 정의
최종 semantic probability는 아래 식 (2)와 같이 정의된다.
Foreground와 sky는 매우 멀리 떨어져 있기 때문에 별도로 처리된다.
Sky는 먼 2D plane으로 가정되며 semantic probobality는 일정한 원핫 벡터 P_sky로 정의된다.
다른 말로 표현하자면 하늘이 전체 neural field에 걸쳐 동일한 시맨틱 클래스를 가지고 있기 때문에 상수로 정의된다. 즉, 하늘이 먼 2D 평면으로 가정되기 때문에 시맨틱 확률이 일정하고 고정된 값이 된다..
T_fg는 카메라 광선 r을 따라 foreground의 누적 투과도(transmittance)이며, P_fg는 렌더링된 semantic logit에 softmax 레이어를 적용하여 얻은 semantic probability이다.
semantic probability
아래는 semantic field의 architecture로 3D point x를 입력 받아 SDF d와 semantic logit s를 출력한다. SDF field로 ManhattanSDF를 사용한다.
semantic field architencture
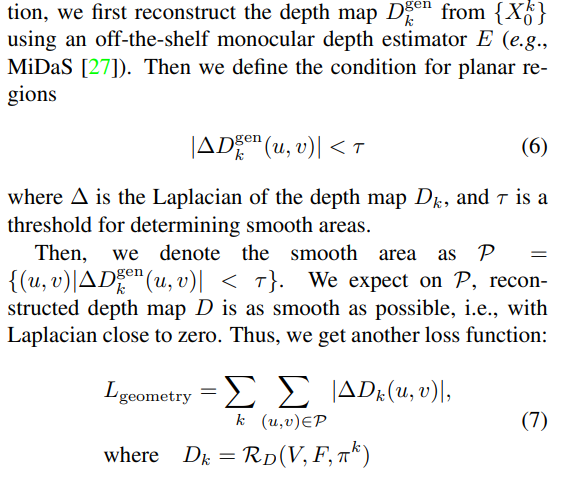
Semantic field는 총 6가지 loss function으로 학습한다. 그 중에서 main loss function인 cross entropy loss, depth loss, trans loss를 소개하고자 한다.
overall loss function
Training losses
Cross entropy loss
Rendered semantic probability P(r)와 infilled semantic mask의 semantic probability P*(r)의 cross entropy loss로 semantic field를 학습한다.
위 첫번째 semantic mask가 infilled semantic mask, 아래 두번째 mask가 rendered semantic maskcross entropy loss
Scale-and shift-invariant loss
Rendered dapth map D와 predicted depth map D^의 차이를 계산하기 위해서 사용된다.
R'은 camera rays of image pixels (sky region을 제외한)을 의미한다.
w과 q는 scale과 shift를 scaling하기 위해서 사용된다.
scale-and shift-invariant loss
Loss on the accumulatedd transmittance
Foreground와 sky 영역을 구분하기 위해 사용된다.
아래 loss는 transmittance가 0과 1사이의 값을 가지도록 한다.
Natural scene representations
Multi-view masks를 바로 RGB 이미지로 변환하는 것은 multi-view consistent한 이미지를 생성하지 못한다.
예를 들어서, semantic field를 학습하여 생성한 semantic mask는 view consistent 하지만 (첫번째 행) 그러한 view-consistent semantic mask로 생성한 RGB 이미지는 view consistent하지 않다 (두번째 행).
따라서 이번 section에서는 학습된 semantic field로 부터 natural scene (RGB image)를 생성하는 과정에 대해서 설명한다.
Neural representation of neatural scenes 소개
Scene representation의 렌더링 및 학습 설명
1. Neural representation of neatural scenes 소개
Semantic field와 appearance field의 차이
Semantic field: "The geometry of the scene is directly modeled as the trained MLP network fθ"
Appearance field: "To represent the scene’s appearance, we recover an appearance field"
appearance field 구조
Appearance field에서 point x는 trifeature planes에 orthogonally하게 projected되어 3개의 feature vectors가 얻어진다. 이러한 feature vectors는 합쳐져 final feature vector가 얻어진다.
MLP(다중 퍼셉트론) 네트워크를 사용하여 aggregated feature vector에서 RGB 값을 회귀
appearance field 정의
Semantic field와 마찬가지로 foreground와 sky를 별도로 모델링한다.
2D generator network를 사용하여 sky는 2D image plane으로 표현되며 멀리 떨어진 위치에 배치된다.
'Sky'로 분류된 ray의 경우, sky image plane은 ray와 sky plane 사이의 교차점 (u, v)를 RGB 값에 매핑한다.
Scene representation을 효율적으로 렌더링하기 위해 사전에 학습된 scene geometry (semantic field?)을 활용하여 카메라 ray를 따라 point sampling을 가이드한다.
MLP 네트워크 fθ (semantic field)에서 mesh를추출하여 각 카메라 ray에 대해 mesh surface point에 대한 색상만 예측한다
Surface guided rendering을 통해 고화질 이미지를 합성하는 계산 비용이 크게 줄어든다.
학습 중에서 geometry network fθ가 고정되고 appearance network는 perceptual loss와 adversarial loss로 최적화된다.
먼저 학습된 semantic field를 사용하여 multi-view semantic mask를 렌더링한 뒤 이를 SPADE로 이미지로 변환한다.
Adversarial loss에서는 변환된 이미지 C가 "fake" 샘플, 생성된 이미지 C^가 "real" 샘플이 된다.
아마도 semantic field에서 나온 mask를 바로 SPADE로 변환한 이미지를 변환된 이미지 (rendered image) 그리고 appearance field에서 나온 feature을 사용하여 MLP로 생성한 이미지를 생성된 이미지 (generated image)라고 부르는 것 같다.
변환된 이미지 C와 생성된 이미지 C^를 바교하기 위해 perceptual loss가 사용된다.
perceptual loss
Experiments
dataset
학습 데이터셋: LHQ
LHQ: a large collection of landscape photos collected from the Internet
논문에서는 미리 설정된 trajectory를 따라 넓은 scene content를 다룬다.
그 다음 나머지 hole들을 채우기 위해 adative한 방식으로 viewpoint를 설정한다.
기존 mesh에 새롭게 생성된 scene content를 어떻게 합칠 것인가
두 depth map을 align하여 자연스러운 scene 전환을 만들어 낸다.
외곡된 texture을 가진 메시의 부분을 제거한다.
Contributions
아무 text input으로부터 설득력 있는 texture와 geometry의 3D mesh를 생성한다.
여기서 geometry는 explicit 3D representation의 종류인 mesh이며, texture은 2D image로 3D mesh를 감싸게 된다. 이후 논문의 mesh의 공식을 보면 알겠지만 mesh에 vertex color 즉 texture가 포함된다. 그래서 mesh와 texture을 매핑하는 mapping function이 필요 없다.
2D text-to-image models과 monocular depth estimation(1개의 이미지만 입력)을 활용하여 frame을 3D로 변환하는 iterative scene generation을 한다. 제안된 depth alignment 및 mesh fusion steps를 통해 해당 논문은 seamless하고 왜곡되지 않은 geometry과 textures을 생성할 수 있다.
두 단계로 구성된 맞춤형 viewpoint selection은 최적 위치에서 카메라 포즈를 샘플링하여 1) 먼저 방 배치와 가구를 생성한 다음 2) 남은 구멍을 메워 완벽한 mesh를 만든다.
Related Works
Text-to-3D
최근의 방법들은 대규모 text-image diffusion 모델과 neural radiance fields를 결합하여 training 과정 없이 3D 객체를 생성한다. 다른 접근 방식은 비슷한 text-to-3D 작업에 대해 custom diffusion models을 훈련시킵니다. 이와 달리, 해당 논문은 fixed text-image 모델을 사용하고 벽과 같은 다양한 객체와 구조 요소를 나타내는 전체 장면을 대표하는 3D mesh를 추출한다.
3D-Consistent View Synthesis from a Single Image
객체의 neural 3D representation을 최적화하여 임의의 새로운 시점에서 볼 수 있게 하는 방법
Perpetual view generation을 수행하며, single RGB image로부터 forward-facing camera trajectory를 따라 scene을 묘사하는 비디오를 render-refine-repeat 패턴으로 합성하는 방법 --> SceneScape가 이 task를 수행한다.
최근 연구에서는text로부터 3D scene을 생성하지만 3D-consistent한 "zoom-out" 비디오 생성에 초점을 둔다. 대신, 해당 논문에서는 임의의 경로에서 완전하고 질감이 존재하는 3D room geometry를 생성
Method
해당 논문은 text로부터 3D mesh를 생성한다. 이를 위해 서로 다른 포즈에서 생성된 2D text-image 모델의 frame을 지속적으로 결합하여 joint 3D mesh로 만들면서 시간의 흐름에 따라 scene을 생성한다. 논문에서 제시하는 제시하는 핵십 아이디어는 두 단계로 이루어진 맞춤형 viewpoint selection이다.
(a) 먼저 scene layout과 객체를 생성한 다음 (b) 3D geomemetry에서 남은 hole을 채운다.
즉, text, camera poses가 주어졌을 때 image를 generate하고 그 image로 부터 depth를 얻는다. 그리고 depth를 사용하여 mesh를 생성하는데 mesh에는 hole이 있기 때문에 그것들을 mask로 표현하고 generative model로 mask를 매꾼 뒤 다시 새로운 mesh를 얻는다. 마지막으로 새로운 mesh를 기존 mesh에 fuse한다.
1. Iterative 3D Scene Generation
vertices의 N은 mesh의 point 개수를 뜻한다.
selected pose의 R^(3x4)의 3x4는 transformation matrix (rotation, translation)의 크기를 나타낸다.
generation step t (iterative generation의 time step)마다 가장 먼저 novel viewpoint로부터의 현재 scene을 렌더링한다.
그 다음fixed text-to-image model을 사용하여 text prompt에 맞추어 관찰되지 않았던 pixel들을 inpainting하여 채워 넣는다.
그 다음 monocular depth estimator을 사용하여 관찰되지 않았던 depth를 inpainting하여 채워 넣는다.
보통 monocular depth estimator은 성능이 안 좋은데 여기서는 어떻게 잘 되었나 보다...
마지막으로 새롭게 생성된 content (inpainted image, inpainted depth, image-space mask)를 합쳐 기존 mesh와 fusion scheme을 사용하여서 합친다.
여기서는 camera position을 알고 있고 inpainted depth를 얻었으니 각 pixel의 depth를 알고 있다. --> point cloud
그리고 이 point cloud를 기존 mesh에 합친다. (mesh는 color와 face가 있다는 것 빼고는 vertices 즉 points로 이루어져있기 때문에 point cloud에서 mesh로 넘나드는 게 쉽다. 물론 fusion scheme에서 image-level pixel을 world-level point cloud로 backproject하는 과정이 있기는 하다.)
위 process는 아래 그림에 해당된다. Inpainting 모델을 사실상 outpainting task에 사용하였다.
2. Depth Alignment Step
Depth는 2D 이미지를 3D로 변환하기 위해서 사용된다. 따라서 정확한 depth map을 얻기 위해서는 얻어야하기 때문에 기존의 depth map과 새롭게 inpainting된 depth map이 잘 align되어야 한다. 즉, 벽이나 가구와 같은 유사한 영역은 비슷한 depth를 가져야 한다.
새롭게 inpainting된 depth map을 바로 사용할 경우 후속 viewpoint (다른 이미지들)에서 깊이가 일정하지 않아 아래와 같이 3D geometry에서 불연속성을 초래할 수 있다. 앞서 monocular depth estimation의 성능이 좋지 않다고 언급하기도 했었다.
이를 극복하기 위해 depth alignment를 2단계에 걸쳐서 진행한다.
Inpainting: GT depth for known parts와 inpainted RGB image를 입력 받아 align하여 refined된 depth를 예측한다.
GT depth = depth from previous camera pose
여기서는 inpainting이라고 표현하였지만 정확히는 rendered depth (a)를 입력 받아 전혀 새로운 depth map을 예측하는 것이다.
scale과 shift parameters을 최적화한다.
다른 카메라 view에서 나온 depth image에서 position이 일정하도록 하기 위한 추가적인 조치
predicted depth을 scaling한 후 shift한다.
5x5 Gaussian kernel을 적용하여 새롭게 aligned된 depth map을 smoothing한다.
하지만, 뾰족한 texture들을 smooth out할 수 있는 단점이 있다. 여기서는 depth가 smooth해야 한다는 가정이 포함된 것 같다. (=prior)
alignment의 두번째 step
3. Mesh Fusion Step
a) Mesh에는 triangle 즉 face를 가지고 있다. 그리고 각 face에는 normal vector가 있다.
b) normal vector가 정확하지 않다고 판단되면 (viewing direction과 너무 작은 사영각을 이루거나 face의 edge가 너무 길 경우, 각도와 형태를 고려) 필터링한다. 이 2가지 조건도 저자가 정의한 prior라고 할 수 있다.
c) Mesh의 vertices를 연결하여 faces를 만들고 기존 mesh에 fusion한다.
new content: d_t (each pixel in depth image), I_t (corresponding color), m_t (mask)
new content(RGBD)를 point cloud를 변환한다.
camara intrinsics = a bunch of numbers that represents the camera geometry
camera intrinsics를 3x3 matrix로 압축한다.
camera extrinsics는 카메라의 위치와 rotation이고, camera intrinsics는 extrinsics로 인한 이미지의 distortion이나 appearance이다.
(b)
저자에 따르면 예측된 depth에 존재하는 많은 noise가 stretched out faces를 만든다고 한다.
이를 제거하기 위한 2가지 필터를 제안한다.
face의 edge length를 기반으로한 필터링
특정 threshold를 정의하여 edge의 유클리디언 거리가 threshold보다 클 시
2. 특정 threshold를 정의하여 surface normal과 viewing direction과의 angle이 threshold보다 작을 시
i_0, i_1, i_2는 triangle을 만드는 3 points이다.
n = normalized된 (unit length) normal vector
v = normalized view direction
n^(T)V가 threshold보다 클 때 face set에 포함되게 된다.
(c)
Inpainting에 사용된 mask를 주변으로 원래 mesh의 face에 연결한다. 이때 원래 mesh의 vertex points를 사용하는데 이는 이전 mesh가 GT라는 assumption때문에 그렇다. -> 이전 mesh에 문제를 고칠 수 없다는 문제가 있다. (이후 논문에서 문제를 해결해도 좋을 듯하다)
4. Two-Stage Viewpoint Selection
1st stage: Generation stage
첫 번째 단계에서는 일반적인 레이아웃과 가구를 포함한 장면의 주요 부분을 생성한다. 이를 위해 서로 다른 방향으로 여러 개의 미리 정의된 경로를 순차적으로 렌더링하여 결국 방 전체를 커버하도록 한다.
Closed room 레이아웃을 만들기 위해 원점을 중심으로 scene을 생성하는 경로를 사용한다.
Prompt engineering을 통해 원치 않는 영역에 가구를 생성하는 것을 방지
예) 바닥이나 천장을 바라보는 포즈의 경우, 각각 "바닥"이나 "천장"이라는 단어만 포함된 텍스트 프롬프트를 선택
2nd stage: Completion stage
Generation stage에서 layout과 가구가 정의되지만 충분한 포즈를 사전에 모두 정의하는 것은 불가능하다.
이로 인해 관측되지 않은 구간에 구멍이 메시에 생기게 된다.
이러한 구멍을 방지하기 위해 추가적인 camera pose를 샘플링한다.
가장 많이 관측되지 않은 픽셀을 보는 pose를 선택
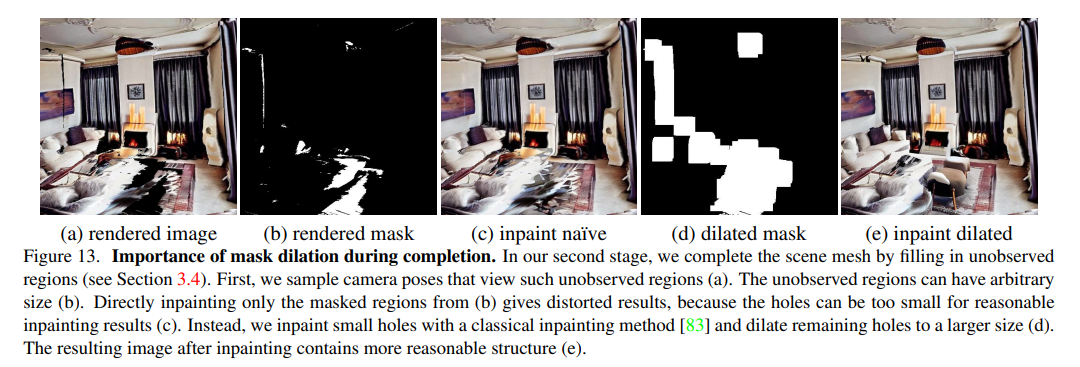
completion stage에서 mask를 정돈하는 것이 중요하다. (text-to-image generation의 특성 때문에)
따라서 작은 구멍들은 고전 inpainting 알고리즘을 사용하여 채워넣고 남은 구멍들을 팽창시켜 mask를 만든다.
마지막으로 poisson surface reconstruction을 mesh에 실행하여 completion 후 여전히 남은 구멍을 메우고 discontinuity를 smoothing한다.
Poisson Surface Reconstruction: 포인트 클라우드의 점들을 연결하고 부드러운 표면을 생성
이를 통해 watertight mesh를 만들고 이는 고전적인 resterization 방법으로 rendering을 가능케 한다.
watertight mesh: 메시의 구멍이나 간격 없이 모든 면이 서로 균일하게 연결되어 완전히 닫힌 형태를 가지고 있는 메시
rasterization: 3D 모델을 화면에 투영하고, 각 픽셀에 대해 해당 픽셀이 어떤 삼각형의 일부인지를 결정하고, 조명, 그림자, 색상 등의 속성을 계산하여 2D 이미지로 변환하는 과정 --> redering 방법의 일종
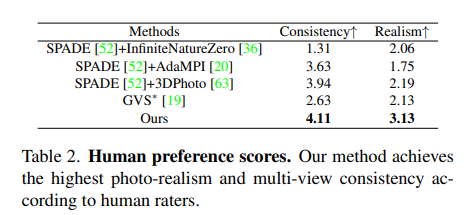
Results
Baselines
텍스트로부터 textured 3D room geometry를 직접 생성하는 기존 baseline이 없다.
PureClipNeRF: text-to-3D methods for generating objects
Outpainting: We combine outpainting from a Stable Diffusion model with depth estimation and triangulation to create a mesh from an 큰 viewpoint. After creating the image, we then perform depth estimation and triangulation to lift the image into a 3D mesh.
Text2Light: 텍스트로부터 RGB 파노라마를 생성한다. 파노라마에서 3D 메시 구조를 추정하는 것은 어렵기 대문에 관련된 접근 방식으로 room layout 추정, view synthesis 또는 360° depth estimation을 수행한다. depth estimation을 수행하고, 이후에 논문에서 제시된 mesh fusion 단계를 적용한다.
Blockade: RGB 파노라마를 생성. 그런 다음 메시를 유사하게 추출한다.
Metrics
Inception Score (IS): 인셉션 점수는 생성된 이미지의 두 가지 주요 측면인 이미지 품질과 다양성을 측정. 이를 위해 ImageNet과 같은 큰 이미지 분류 데이터셋에서 사전 훈련된 인셉션-v3 합성곱 신경망을 특징 추출기로 사용
CLIP Score (CS): CLIP score는 이미지-텍스트 similarity에 대한 평가를 제공
Results
Limitations
임계값 설정: 모든 stretched region을 감지하지 못할 수 있으며, 이로 인해 왜곡이 남을 수 있다.
두 번째 단계 이후에도 일부 구멍이 완전히 채워지지 않을 수 있으며, 이로 인해 poisson reconstruction 적용 후에 지나치게 oversmoothed한 영역이 생길 수 있다.
논문의 scene representation은 조명으로부터 texture을 분리하지 않으며, 이로 인해 그림자나 밝은 램프와 같은 효과가 포함되게 된다.
여기까지는 논문에서 언급한 한계이고, 다른 한계로는 위에서 언급했 듯이 이때 원래 이전 mesh가 GT라는 assumption때문에 이전 mesh에 문제를 고칠 수 없는 것이 있다. 만들어진 mesh들을 합쳐서 더 나은 mesh를 만드는 방법이 있었으면 좋겠다.
논문에서 명칭한 task의 정확한 이름은 text-drivenperpetual view generation이다.
Perpetual view generation: 주어진 camera path에 따라 주어진 image의 새로운 scenes들을 무한히 합성하는 task
perpetual = never ending or changing.
논문의 key contributions은 다음과 같다:
Perpetual view generation을 text의 가이드에 따라 수행하는 첫 모델. Pretrained된 text-image generator을 사용함으로써 training dataset이 domain에 국한 되었던 기존 모델에 비해 다양한 domain에 대한 video를 생성할 수 있다. 더불어 camera trajectory와 text만으로도 task를 수행할 수 있다.
Zero-shot/test-time으로 scene을 생성하는 가장 첫 모델. 다양한 scene을 large-scale training on a specific target domain 없이 합성한다.
점진적으로 통합된 3D representation of the scene을 예측함으로써 3D-consistency를 달성한다.
Related Works
Perpetual view generation
Desired camera path에 따른 infinite scene을 생성
최근에는 singe image와 camera motion을 입력 받아 indoor scene 또는 lange-range landscapes 등을 합성하는 연구가 있었다.
하지만 text-driven 접근 방법에 대한 연구는 없었다.
3D-Consistent view synthesis from a single image
Single image로 novel view synthesis task를 수행하기 위한 다양한 방법들이 제시되고 있다.
대용량 데이터셋에 학습을 하는 동안에 NeRF를 unified 3D representation으로 사용하는 많은 연구가 이루어졌다.
Multi-plane images, point clouds 등 고차원 feature를 표현할 수 있는 3D representation또는 textured-mesh representation 같은 3D representation도 사용되어 왔다.
CLIP을 사용하여 CLIP 임베딩 공간 상에서 input image와 novel views간의 유사도를 높이는 방안도 제시되었다.
이러한 방법들은 specific domain에 국한될 뿐만 아니라 다양한 scene을 perpetual하게 생성하는 데에 한계가 있다.
3D-Aware image generation
생성 모델에 3D representation을 explicitly하게 합치는 작업을 수반한다.
예를들어 NeRF representation, neural surface renderer가 있다.
Text-to-video generation and editing
일각에서 2D text-image model을 video editing task에 사용하는 방법들이 우후죽순 생겨나고 있다.
해당 논문에서도 explicit 3D scene representation에 더불어 위 방법을 사용한다.
Text-to-3D Generation and Editing
최근, language-vision pre-trained 모델과 differentiable renderes이 text-driven 3D content 생성에 많이 사용되어 왔다.
예를 들어, 최근 논문인 Text2Room에서는 textual prompt를 사용하여 3D scene을 생성하는방법을 택했다. 하지만 해당 논문과 다르게 Text2Room은 room meshes를 생성하고 camera trajectory, prompt, 그리고 mesh rendering을 이 목적을 위해 재단하는 과정을 거친다. 반면, 해당논문은 video를 생성할 때만 mesh representation을 사용한다. (결론 = 우리는 input이 간결하다) - Text2Room 리뷰는 나중에.....
Method
입력: text prmpt P, camera trajectory
(아무리 원하는 scene을 text를 넣어서 만든다고 해도 single image를 넣고 거기서부터 확장하고자 하는 needs도 있을 텐데 like single image view synthesis, 이를 다루어봐도 괜찮을 것 같다)
Rough Procedure
.Framework는 video를 한 frame 씩 생성한다
pretrained text-to-image diffusion model (I)
camera의 움직에 따른 새로운 content를 생성
pretrained monocular depth prediction model (D)
새롭게 생성된 content의 geometry를 예측
이 두 모델은 unified 3D representation으로 통합된다.
더 자세히 말하자면, time step t마다 새롭게 생성된 content와 이의 depth는 unified mesh representation M을 업데이트하기 위해 사용된다.
frame마다 M이 계속 업데이트되기 때문에 unified라는 수식어를 붙여준 듯하다.
이렇게 업데이트 된 M_t은 C_(t+1)에 projected된다.
1. Initialization and Scene Representation
비디오의 가장 첫 프레임 I_0은 text-to-image inpainting model에 text prompt P와 모든 값이 1인 mask M를 넣어서 (즉, masking을 하지 않고) 생성한다.
그 다음 I_0을 pre-trained depth prediction model g에 넣어서 D_0을 예측한다.
예측된 D와 C들로 I_(t+1)을 렌더링하기 위한 나이브한 접근 방식은 I_t를 C_(t+1)로 변형하는 것이다. 예를 들어, 2D 스플래팅을 사용할 수 있다.
2D 스플래팅은 2차원 이미지를 다른 좌표계로 변환하는 기술 중 하나이다.
하지만, depths D가 일정하더라도 3D-consistent한 scene을 생성하는 것은 challenging하다.
원인 1: 일반적인 camera motion에서는 하나의 프레임에서 여러 픽셀이 다음 프레임에서 동일한 픽셀로 매핑된다.
카메라가 회전하면서 픽셀이 다른 픽셀로 덮여져 여러 픽셀이 동일한 위치에 매핑되는 경우를 말하는 것 같다.
이에 대하여 논문에서는 "Thus, the aggregated color needs to be selected carefully"라고 말하는데 이는 픽셀이 동일한 위치에 매핑되기 때문에, 해당 위치의 픽셀들의 색상들의 최종 색상을 신중하게 선택해야 한다는 것으로 이해할 수 있다.
원인 2: frame-to-frame warping(프레임간 변형)은 unified represetation이 부족하기 때문에 변형된 프레임에서 장면의 일부가 가려지면, 해당 부분은 다시 노출될 때마다 처음부터 생성된다는 한계가 있다.
결론: 2D splatting 같은 프레임간 변형 (I_t를 C_(t+1)로 변형) 은 3D consistency가 부족하여 좋지 않은 선택이다.
이러한 한계를 극복하기 위해 해당 논문은 unified traingle meshM=(V,F,E)를 사용한다.
V = a tuple of vertices (3D location and color), F = faces, E=edges
M_0을 구하기 위해서 (I_0, D_0)을 unprojecting한다.
위 방식으로 첫번째 scene이 생성되면 각 합셩 단계는 다음과 같은 main stages들을 거치게 된다.
2. Project and Inpaint
3. Test-time Depth Finetuning
2. Project and Inpaint
앞서 unified 3D representation으로 해당 논문에서는 unified mesh representationM이 사용된다고 언급하였다.
M_t은 time t에 해당하는 scene content를 표현한다.
이 mesh (M)는 t+1의 camera C_(t+1)에 project된다.
새롭게 얻은 t+1의 masked conditioning image와 masked depth map과 text prompt를 사용하여 inpainting한 후 frame image I(t+1)을 생성한다.
3. Test-time Depth Finetuning
M을 업데이트하는 가장 간단한 방법은 위에서 생성한 I_(t+1)의 depth map을 바로 계산하는 것이다. 하지만 monocular depth prediction은 inconsistent한 경향이 있어서 I_(t+1)로 생성한 D_(t+1)이 현재 scene의 geometry M_t와 잘 align될지 모른다.
이를 해결하기 위해서 depth prediction model을 test-time training하여 current secne geometry와 최대한 consistent하게 만든다.
test-time training (TTT)는 한 논문에서 제시한 방법으로 다음과 같이 설명한다. "improving the performance of predictive models when training and test data come from different distributions. We turn a single unlabeled test sample into a selfsupervised learning problem, on which we update the model parameters before making a prediction."
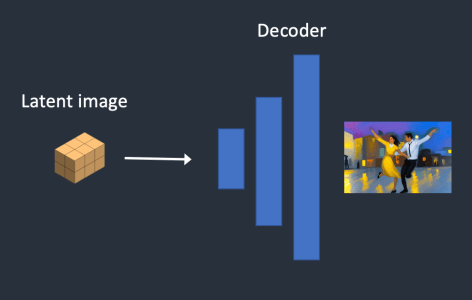
4. Test-time Decoder Finetuning
위 논문에서 언급하듯 inpainting은 image level이 아닌 latent space 상에서 이루어지게 된다.
하지만 encoding-decoding하는 과정에서 정보 손실이 일어나거나 디코딩 과정에서 인코딩된 이미지의 mask region에서만 content가 생성되지 않는 문제가 있다.
따라서 위 (4) 수식을 이용하여 decoder을 TTT한다.
첫번째 term은 inpainting된 latent를 decoding한 후 mask를 씌운 결과물이 원래의 masked image와 유사해지도록 하는 term이다.즉, Text-to-Image Inpainting model의 전후 (후는mask를 씌워서)가 유사해지도록 하여 decoder가 known content를 잘 복원하도록하는 역할을 수행한다.
Prior preservation loss를 제안한 blended latent diffusion 논문의설명
두번째 term은 Prior preservation loss으로 모델이 사전에 알고있는 성질을 보존하도록 훈련될 수 있도록 도와주는 역할을 수행한다. 위 수식 (4)를 보면 Mask를 제외한 즉 inpainting 대상이 아닌 region에서 원래의 fixed LDM과 finetuning 대상의 LDM의 inpainting 결과물에서 유사하도록 한다.
5. Online Mesh Update
Results
50 frame long video을 생
Ablation studies on TTTQuantitative results
사용 test 데이터셋: VideoFusion, GEN-1
Rot., Trans. = accuracy of estimated camera poses
We measure the normalized mean accuracy of camera positions (in percentage, relative to the overall camera trajectory), and camera rotations (in degrees)
Reproj. = reprojection error
Density = percentage of reconstructed video pixels
AMT = AMT user study, where we report the percentage of judgments in favor of our full method
We collect 3,000 user judgments over 60 video pairs from 50 participants
CLIP text-similarity score = mean cosine similarity between the prompt and each of the frames.
Conclusion
Idea contribution: how to harness two powerful pre-trained models, allowing us to generate scenes in a zero-shot manner without requiring any training data from a specific domain
Techical contribution: how to combine these models with a unified 3D scene representation, which by construction ensures feasible geometry, and enables high quality and efficient rendering.
limitation: since we represent the scene with triangular meth, it is difficult for our method to represent dramatic depth discontinuities, e.g., sky vs. ground in outdoor scenes
텍스트 기반 이미지 inpainting 모델은 image-text 입력 쌍 데이터셋으로 훈련된다
훈련 중에는 mask, image, text prompt를 사용하여 직접 missing pixel을 inpaint하는 방법을 배우지 않는다.
대신, 주어진 text 설명과 일치하는 이미지를 생성하는 방법을 학습한다. (text-guided image generation)
즉 텍스트 기반 이미지 inpainting 모델은 훈련 중에 이미지 마스크, 이미지 및 텍스트 프롬프트를 직접적으로 inpaint하는 방법을 배우지 않고, 주어진 텍스트 설명과 일치하는 이미지를 생성하는 방법을 학습한다.
모델이 훈련된 후에는 추론 시에 masked image와 text prompt를 조건으로 text 기반 image inpainting을 수행한다.
추론 과정에서는 masked image, text prompt 그리고 sampling strategy가 모델에 주어진다. 이를 기반으로 모델은 masked image의 missing pixel을 채워넣은 이미지를 생성한다.
sampling strategy: 추론 시에 여러 plausible 이미지를 생성하는 방법을 뜻한다. 이를 결합하여 최종 inpainted 이미지를 형성한다.
핟습 데이터셋에 image mask를 제외시킴으로써 모델은 학습 동안에 textual description과 image 사이의 관계를 학습하는 것에 더 포커스를 둘 수 있다. (Mask를 포함시키면 모델이 inpainting을 mask에 의존할 수 있기 때문이다.)
따라서 텍스트 기반 image inpaintring 모델은 image mask, text prompt 그리고 image pairs으로 훈련되지 않지만 추론 시에는 이들을 사용하여 새로운 이미지를 생성한다.
이러한 모델들은 image와 text의 복잡한 관계를 학습하기 위해 대규모의 image-text 데이터셋으로 훈련되며, 이를 통해 추론 시에 주어진 text-prompt에 대응되는 이미지를 생성할 수 있다.
즉, 모델은 text-image 관계에 대한 학습된 이해력을 활용하여 주어진 text prompt에 기반하여 마스크된 이미지를 inpaint한다. 모델은 text를 guide로 활용하여 제공된 text description과 조화를 이루는 이미지를 생성하며, 훈련 중에 습득한 텍스트 기반 image generation 능력을 추론 과정에서 inpainting 작업에 적용한다.
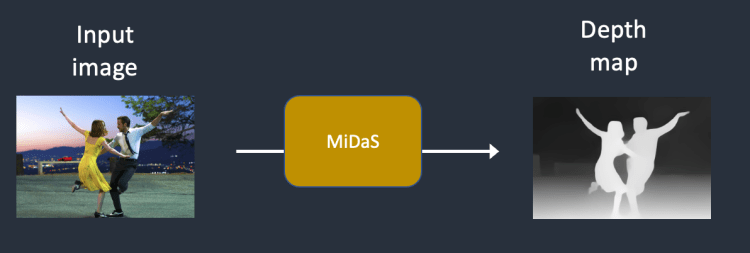
Depth-Conditioned Image Inpainting Pipeline
위의 텍스트 기반 이미지 inpainting 모델과 달리 depth-conditioned image generation pipeline의 경우 훈련 시 image와 이에 대응하는 depth map과 text prompt로 학습이 된다.
훈련 중에는 image-depth-text 세트가 주어지며, 이미지와 대응하는 depth map은 원하는 컨텐츠나 수정 사항을 설명하는 text prompt와 짝을 이룬다. 모델은 주어진 text prompt의 의도를 고려하여 image와 depth map에 맞추어 이미지를 생성한다.
이와 같은 데이터셋을 기반으로 모델은 제공된 depth map을 이미지 생성중에 추가적인 condition으로 활용하여 학습을 진행하게 된다.
이를 통해 모델은 text description과 일치하는 이미지를 생성하면서도 depth 정보를 고려하여 visually consistent한 결과출을 생성할 수 있다.
추론 시에는 depth-conditioned image generation에 모델이 사용될 때, 모델은 masked image와 대응되는 depth map 그리고 text prompt를 입력 받는다. 그리고 missing pixel을 depth information과 text description에 맞추어 inpainting한다.
요약하자면 두 pipeline 모두 text prompt를 기반으로 이미지를 생성하지만, text-driven depth-conditioned inpainting pipeline은 depth 정보를 학습 동안에 포함한다. 이를 통해서 생성된 이미지의 품질과 일관성을 향상시킨다.
바깥 view를 생성하는 가장 대표적인 novel view synthesis 모델이라고 할 수 있다.
2020년 CVPR에 등재되었다.
Introduction
기존 방법들의 한계:
multiple views
occluded object를 추적하는 데 좋음
But applicability가 떨어짐 (여러 view에서 사진 찍어야 됨)
training a convolutional network to estimate depth from images
single-image view synthesis가 가능해짐 --> 왜 그런지에 대한 추가 조사 필요
GT depth map이 학습에 필요함, 더불어 학습된 데이터가 실내면 실외에서는 성능이 안 좋음 (lack of generalization)
utilzing 3D-aware intermediate representations
학습 동안에 3D information을 사용하지 않음
3D information와 3D-aware intermediate representation의 차이에 대해서 궁금해서 search를 해보았지만 정확한 정보를 얻을 수 없었다. 나의 뇌피셜이지만 두 정보의 차이는 3D cordinates 같은 full 정보를 encoding하느냐 아니면 voxel이나 point cloud처럼 3D 구조의 일부 정보를 indirectly하게 포함하느냐인 것인 거 같다. (partiality of 3D information) --> 확인 필요
대신, end-to-end 생성 모델과 3D-aware intermediate representations을 사용하여 image supervision만으로도 학습이 가능
single object로 이루어진 합성 scene에 대해서 좋은 성능을 보임
하지만 복잡한 real-world scene에 대해서는 낮은 성능을 보임
SynSin은 end-to-end model로 GT 3D supervsion 없이 학습이 가능함. 더불어 3D scene sturucture을 high-resolution point cloud로 표현함.
point cloud는 "3D 공간에서 점의 모음으로 3D 장면이나 객체를 나타내는 3D-aware intermediate representation" 으로 https://23min.tistory.com/8에 잘 정리되어 있다.
Differentiable rendering과 3D reasoning이 발전함에 따라 novel view synthesis에서 많은 성과가 있었다. 하지만 이러한 발전에도 불구하고 기존 논문들은 상대적으로 작은 view change만 다룬다는 한계가 있다.
Differentiable rendering: 미분가능한 rendering function을 제공하는 것이 목표이다. 미분가능한 rendering function은 많은 최적화 기법이 미분값을 사용하기 때문에 필요하며 예를 들어, gradient descent algorithm은 derivative를 사용하여 파라미터를 조정하며 신경망은 back propagation을 통해서 weights를 조정한다.
3D reasoning: 모델이 scene의 3D 구조를 이해하는 능력을 지칭한다.
3D rendering: 3D scene을 입력 받아 2D 이미지를 출력하는 함수
이러한 한계를 극복하기 위하여 PixelSynth는 3D reasoning과 autoregressive를 결합하여 3D consistent manner로 large view change를 달성한다.
Introduction
View synthesis와 autoregressive model의 한계를 지적한다.
Novel view synthesis
한 single view의 여러 input views 사이를 interpolation하는 novel view synthesis에는 많은 발전이 있었다.
이 중에서도 3D-aware한 모델들은 여러 각도 change에도 일관된 장소(?)의 결과를 보여준다. (예를 들어서 room에서 10도에서의 view와 20도에서의 view가 서로 다른 room을 보여주면 안 된다.)
하지만 이러한 모델들은 input view에서 더 확장(extrapolation)하려는 시도를 하지 않는다.
Single image view synthesis에서 기존 모델들은 아주 조금의 rotation에만 확장할 수 있다.
Autoregressive models
Autoregressive models는 이미지 확장에서 좋은 성능을 보이지만 이미지 바운더리 밖에서 생성된 영역의 일관된 3D world를 모델링하려는 시도가 없다.
이러한 한계들을 PixelSynth논문은 3D reasoning과 autoregressive를 결합하여 극복한다. 즉, 기존 novel view synthesis의 3D reasoning에서의 강점과 autoregressive model의 이미지 확장 강점을 결합하여 각자의 한계을 보완했다고 할 수 있다.
PixelSynth의 결합 방법을 간략하게 설명하자면 다음과 같다.
extrapolation: autoregressive 모델 사용
각 output view를 독립적으로 생성하면 일관되지 않은 결과가 생성되니깐 support set이라는 것을 사용.
Support views: novel view를 합성하기 위해서 참조하는 views. 논문에서는 intermediate views를 생성하기 위해서 먼저 support views를 생성한다.
3D consistency: Intermediate view들은 scene representation으로부터 re-render된다. (정확한 기전은 후술한다.)
Related Work
Novel view synthesis
Deep networks는 3D 정보를 depth image, multi-plane image, point cloud, voxel, mesh, multi-plane mesh, radiance field 등을 사용하여 표현한다.
PixelSynth는 masked convolution approach를 사용하여 custom한 region을 outpaint한다.
Masked convolution은 kernel의 receptive field를 제한함으로써 local feature을 효과적으로 학습하는 데 도움을 준다. 특정 feature와 관련이 없는 영역을 가려내면서 네트워크는 더 정밀한 local information에 집중할 수 있다.
Approach
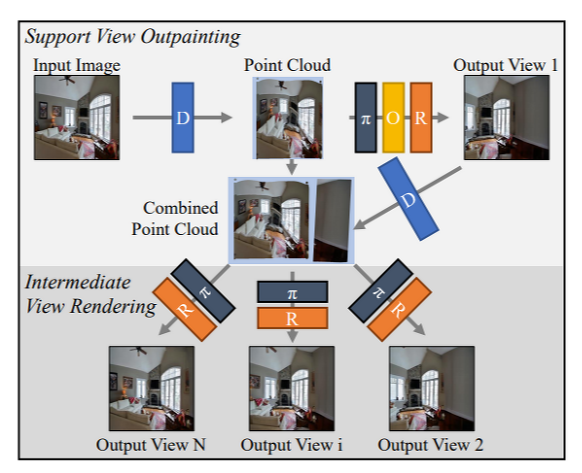
Summary: 위 그림처럼 PixelSynth는 external support views에 데이터를 생성한 뒤 point clouds 상에서 작동한다. 그 다음 autoregressive model을 사용하여 support views를 outpaint한다. Intermediate views를 reprojection하며 refinement module을 사용하여 결과를 개선한다. 그리고 그 과정에서 image들을 point clouds 상으로 self-supervised depth module을 사용하여 옮기고 다시 differentiable render을 사용하여 이미지로 되돌린다.
3D and Synthesis Modules
Depth moduleD
주어진 이미지 I에 대해, 학습된 깊이 예측 시스템을 사용하여 이를 컬러 포인트 클라우드 C로 변환한다. 구체적으로, 픽셀 단위의 깊이는 U-Net을 사용하여 추론되며, 픽셀은 known intrinsics를 사용하여 3D로 매핑된다. PixelSynth reprojection loss을 통해 end-to-endfh depth module D를 학습한다.
Projectorπ
Depth module로 부터 얻은 C와 6DOF 포즈 p에 대해, Pytorch3D의 미분 가능한 렌더러를 사용하여 이미지 I = π(C, p)로 투영한다. 이 렌더러는 soft Z-버퍼를 사용하여 인접한 포인트를 혼합한다.
6DOF (six degrees of freedom): 6개의 매개변수(translation:(x,y,z), rotation:(roll, pitch, yawn))를 사용하여 객체의 위치와 방향을 3차원 공간에서 표현하고 조작하는 방법. 6DOF 포즈를 정의함으로써, 객체를 좌표계와 관련하여 정확하게 위치시키고 방향을 조절할 수 있다.
z-buffer (or depth buffer): 3차원 장면에서 객체의 가시성과 깊이 순서를 결정하는 데 사용되는 기술. 각 픽셀의 깊이 값(카메라로부터의 거리)을 저장하는 2차원 배열이며 렌더링 중에 각 객체가 화면에 투영됨에 따라, 각 픽셀의 깊이 값은 Z-버퍼에 저장된 해당 값과 비교된다. 새로운 객체가 해당 픽셀에서 이전에 렌더링된 객체보다 카메라에 더 가까울 경우, 그 깊이 값은 Z-버퍼에 저장된 기존 값과 교체되어 해당 픽셀에서 가장 가까운 객체임을 나타낸다. Z-버퍼를 사용함으로써 객체를 올바른 깊이 순서로 렌더링하여, 가까운 객체가 먼 객체를 가리도록 할 수 있다.
OutpainterO
viewpoint가 많이 변할 경우 생기는 large missing region을 채워 넣는 역할을 수행한다.
위에서 언급한 specific region은 viewpoint 이동과 이미지 콘텐츠에 따라 결정된다.
image outpainting은 VQ-VAE의 latent space에서 수행된다.
VQ-Vector Quantized Variational Autoencoder (VAE)
VAE와 vector quantization을 융합한 생성 모델이다.
VAE는 비지도학습에 사용되는 구조로 learned latent space로부터 sample을 생성하는 것에 초점을 둔다 (encoder에 초점을 두는 AE와 차이)
VQ는 continuous 데이터를 latent space 상에서 유한한 개수의 discrete 벡터로 quantize한다.
VQ-VAE에서는 VAE의 latent space 상에 VQ가 적용된다.
VQ-VAE는 image generation에 있어서 여러 장점이 있는데 이건 나중에 찾아보도록 하겠다;;
O에서는 PixelCNN++ arhitecture을 사용해서 pixel 임베딩을 예측하고 locally masked convolution을 사용해서 image-specific custom-pixel ordering을 차용한다.
더 자세히 설명하자면, locally masked convolution은 각 이미지에 맞는 customized된 pixel의 순서를 정한다. Visible region에 가까운 정도를 기반으로 순서를 매겨 픽셀을 처리한다 .
Refinement ModuleR
O이 많은 경우 불완전한 depth로 인하여 inconsistant하거나 디테일이 부족한 이미지를 생성하곤 한다.
따라서 R을 사용해서 local errors를 수정한다.
reprojection된 원본 이미지와 outpainted된 픽셀들을 융합하여 입력 이미지의 잔여물을 예측한다.
Inference
Inference에서는 다음과 같은 과정을 거친다: support view outpainting --> intermediate view rendering
Support View Outpainting and Refinement
single input image와 6DOF pose (P_1)를 입력 받아 업데이트된 point cloud (combined point cloud)를 얻는다.
combined point cloud는 P_1에서 보이는 pixel들을 포함한다.
첫번째로, 입력 이미지로 부터 얻은 point cloud c와 6DOF pose P_1 를 projection하여 support view (image) I'를 예측한다.
위 figure처럼 projection 이후에는 (reprojection) image-specific gap이 생긴다.
두번째로, image-specific gap이 있는 이미지를 outpainting한 뒤 refinement module R에 입력한다.