https://stable-diffusion-art.com/how-stable-diffusion-work/#Depth-to-image
How does Stable Diffusion work? - Stable Diffusion Art
Stable Diffusion is a deep-learning model. We will dig deep into understanding how Stable Diffusion work under the hood.
stable-diffusion-art.com
Novel view synthesis에서 자주 등장하는 depth에 대해서 공부할 필요성을 느꼈다. 가장 첫번째로 stable diffusion의 depth-to-image 기능을 알아보고자 한다.
Depth-to-image
Image-to-Image의 심화된 버전이라고 할 수 있다. (다만 depth이라는 condition이 한개 늘어났다 --> condition: input image + text prompt + depth map)
Step 1. Encoder로 입력 이미지를 latent space 상로 인코딩한다.

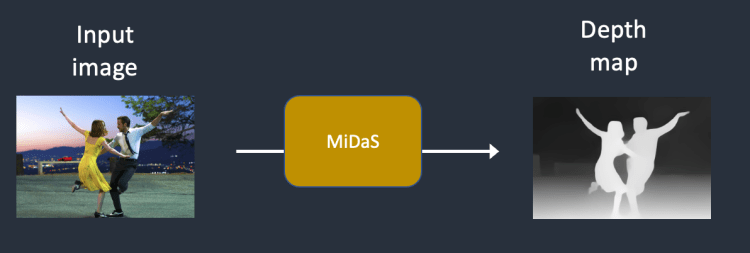
Step 2. Depth model인 MiDaS로 입력 이미지의 depth map을 예측한다.
Step 3. Latent space 상의 이미지에 noise를 추가한다. (diffusion의 작동 원리를 보면 이해가 될 것이다.)

Step 4. 간략하게 설명하자면, text prompt와 depth map에 condition을 두고 noise predictor을 사용하여 이전 noise를 추가한 image의 noise를 latent 상에서 예측한다.

Step 5. Latent space 상의 이미지로부터 이전 단계에서 예측한 noise를 제거하여 새로운 latent 이미지를 획득한다.

Steps 4 and 5은 number of sampling steps 만큼 반복된다. (이해가 가지 않는다면 diffusion model의 기전을 학습하기를 바란다.)
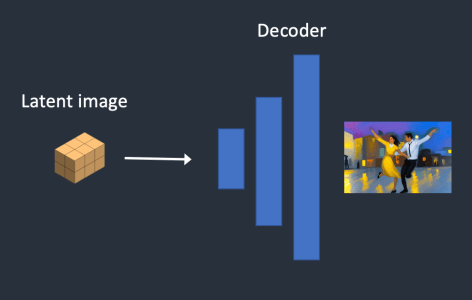
Step 6. VAE의 decode로 latent image를 decoding하여 depth-to-image를 생성한다.
그렇다면 text에만 conditioning하여 생성한 이미지보다 text+depth map에 conditioning하여 생성한 이미지가 더 좋은 점을 뭘까?
바로 subject와 배경을 분리하여 합성하는 것이 용이해진다는 것이다.

위 사진을 보면 a photo of two men wresting이라는 text prompt가 주어졌을 때, img2img보다 depth2img가 denoising strength가 올라가도 원래의 composition을 잃지 않고 합성한다.
또한 이러한 기능 말고도 이미지와 대응되는 depth map을 결합하면 입체 이미지를 획득할 수 있다 (여기에 포함하고 싶었지만....)
'Novel View Synthesis' 카테고리의 다른 글
| [논문 리뷰] Text2Room: Extracting Textured 3D Meshes from 2D Text-to-Image Models (0) | 2023.06.07 |
|---|---|
| [논문 리뷰] SceneScape: Text-Driven Consistent Scene Generation (0) | 2023.06.05 |
| [배경 지식] depth-conditioned image generation (0) | 2023.06.02 |
| [논문 리뷰] SynSin: End-to-end View Synthesis from a Single Image (0) | 2023.06.01 |
| [논문 리뷰] PixelSynth: Generative a 3D-Consistent Experience from a Single Image (0) | 2023.05.24 |